- Story and recipes by Chef Heidi Fink Photography by Don Denton
Story courtesy of Boulevard Magazine, a Black Press Media publication
Like Boulevard Magazine on Facebook and follow them on Instagram
Tapas: the traditional, Spanish style of eating small bites of flavourful food while sipping on adult beverages. It’s a genius idea, and one that adapts well to home entertaining. Small plates, casual service, and delicious variety is the heart of tapas and the soul of summer entertaining.
Authentic tapas can run the gamut of simple cold dishes of olives and sliced cheese to more elaborate pre-cooked concoctions of tortilla (potato frittata), albondigas (amazing meatballs) and piquillo bacalao (roasted peppers stuffed with whipped salt cod). Although the cooked tapas are wonderful, the simple ones can still wow a houseful of guests.
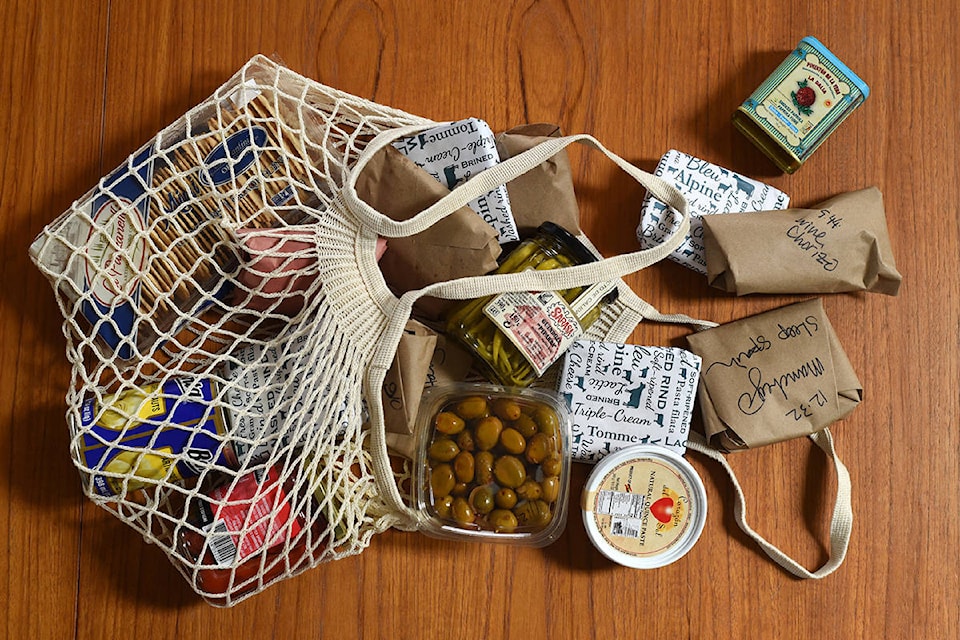
My simple tapas entertaining idea comes from a crowd favourite in my Spanish cooking class: something I call “Shop & Serve Tapas.” It’s a collection of high-quality Spanish cheeses, meats, deli items, breads and nuts, arranged beautifully on platters and served as pre-class, or pre-meal, nibbles.
As a method of entertaining, “shop and serve” done right is easy on the host, stunning for the guests and delicious and filling. The trick is to source the right ingredients, plate them beautifully and throw in a few twists of your own.
I always start with a collection perfectly ripe cheeses that range from creamy and sweet to blue-veined. (If you are unsure of how to build a good cheese platter, see my tips below and enlist the help of knowledgeable cheese sellers at any of the delis in town.) I then add shaved Jamón ibérico or Jamón serrano (dry-cured Spanish ham), thinly sliced spicy chorizo and dry-cured wine chorizo. Round out the selection with delicious tidbits: marinated olives, warm spiced nuts, membrillo (aromatic quince paste), artichoke hearts, and piquillo peppers. These, combined with sliced breads, crackers, a full-bodied red wine or crisp white wine and a lovely table, make for a perfect storm of entertaining magic. Simple and fun for the hosts, inviting for the guests.
Victoria is lucky to have a number of wonderful delis to source authentic Spanish ingredients. See the list below of just a few great delis. A simple shopping trip, some fun playing with plating and garnishing, and possibly a few quick and easy marinades, and your meal is done. Impressive, delicious and a whole lot of fun!
Must-haves for Shop & Serve Tapas:
• Two types of olives (usually spicy Spanish from Charelli’s or home-marinated Mantequilla olives plus a black olive)
• Quince paste: known as membrillo, this sweet-sour and flavourful paste pairs beautifully with cheese and blue cheese in particular
• Spanish salted almonds (see recipe)
• Three to six varieties of Spanish cheese (see cheese platter list below)
• Charcuterie platter with Jamón serrano and sliced dry cured chorizo
• Marinated piquillo peppers, marinated artichoke hearts, or other marinated vegetables of your choice (see recipes)
• Sliced baguette, crackers, rice crackers and other objects for holding cheese
• Anything else that strikes your fancy, including cooked tapas Tortilla Espanola (see recipe)
PLACES TO BUY SPANISH INGREDIENTS
Charelli’s Cheese Shop & Deli, 2851 Foul Bay Rd, 250.598.4794
Ottavio Italian Bakery & Deli, 2272 Oak Bay Ave, 250.592.4080
Choux Choux Charcuterie, 830 Fort St, 250.382.7572
HOW TO BUILD A CHEESE BOARD
Most important rule: Have fun and enjoy the different flavours, textures and aromas of the cheeses you have chosen. The information below has been provided as a guideline only — there is no true right or wrong way to enjoy cheeses.
How to choose cheese for a platter
If you are unsure of where to start, enlist the help of the knowledgeable cheese sellers at any of the delis in town.
Select at least three cheeses that vary in shape, size and colour for a visually interesting platter. Choose cheeses of different textures: one soft, one firm, one crumbly, for example.
Choosing different textures will also take care of the next rule: choose cheese of different flavour profiles. Have a variety of flavours, from mild and sweet, to strong, sharp, creamy.
Aim to have at least two different milk-types represented. The most commonly available milk types are goat, sheep and cow.
Most of all, choose cheeses that you LOVE. Ask the cheese seller for samples and recommendations.
For more fun, choose a theme; for instance, select cheeses from the same region or by the same cheesemaker. In this article, I built the platter almost exclusively from Spanish cheeses, most of which are firm, sheep-milk cheeses, that still provide an interesting contrast in flavours.
Display
Make sure you have a large enough surface to fit cheeses comfortably with enough space between them so your guests can cut them easily. It’s trendy right now to cram platters and boards full, with every available surface covered with garnishes, figs, charcuterie, pickles. While this looks stunning at first, it interferes with your guests’ ability to serve themselves, and it disturbs the natural beauty of the cheeses themselves. Feel free to add small bowls of olives, fig jam, chutney, quince paste and anything else that would enhance the guests’ experience with the cheese — but don’t go crazy.
MARINATED ROASTED PEPPERS
This recipe can easily be made with home-roasted peppers, if desired. But the small, sweet and flavourful Spanish piquillo peppers are available roasted in jars at a couple of delis around town and make an excellent addition to the tapas table.
1 jar roasted piquillo peppers, drained, sliced
45 ml (3 Tbsp) extra-virgin olive oil
2.5 ml (1/2 tsp) salt, or more, to taste
2.5 ml (1/2 tsp) sweet paprika, or more, to taste
15 to 30 ml (1 to 2 Tbsp) freshly squeezed lemon juice,
to taste
In a medium bowl, mix together sliced peppers, olive oil, salt, paprika and lemon juice, stirring to mix well. Allow the mixture to sit for at least 10 minutes before adjusting the seasonings (it may need more salt and/or lemon juice). This can be made up to two days in advance or served immediately.
QUICK-MARINATED ARTICHOKE HEARTS
I prefer to buy plain canned artichoke hearts and add my own lemony, herb-y marinade. Bright and fresh tasting, this is one of my favourite quick recipes.
1 can artichoke hearts (not marinated), drained, sliced thin
45 ml (3 Tbsp) extra-virgin olive oil
1.5 ml (¼ tsp) salt or more, to taste,
1 clove garlic, peeled and minced very fine, or pressed through a garlic press
60 ml (4 Tbsp) finely minced parsley
30 ml (2 Tbsp) freshly squeezed lemon juice
In a medium bowl, mix together sliced artichoke hearts, olive oil, salt, garlic and lemon juice, stirring to mix well. Allow the mixture to sit for at least 10 minutes before adjusting the seasonings. This is best made at least one hour before serving, and up to two days in advance. Just before serving, stir in the minced fresh parsley. The parsley will lose its colour if it is added too far in advance.
MARINATED OLIVES
500 ml (2 cups) Mantequilla olives, or other high-quality olive
60 ml (¼ cup) extra-virgin olive oil
8 garlic cloves, peeled and smashed
zest of 1 lemon, thinly sliced or grated
10 ml (2 tsp) fennel seeds, lightly crushed
2.5 ml (½ tsp) red chili flakes
Gently heat the olive oil with the garlic, lemon zest, fennel seeds and red chili flakes. Be sure not to cook it, just heat it up a bit to help release the flavours. Pour everything over the olives and let marinate for at least 1 day, and up to 5 days, before serving.
SPANISH SPICED ALMONDS
This is the best kind of a recipe: one that is very simple, but tastes VERY more-ish. Fried almonds (almendras fritas) are an authentic tapa in Spain — the almonds are traditionally deep fried and then salted (always) and spiced (frequently) and served either warm or at room temperature. I have adapted the recipe to be pan-toasted in olive oil; it’s just as tasty and not so intimidating. I prefer the almonds while they are still warm – for a more interesting eating experience – but they are still delicious at room temperature. Feel free to play around with the spicing: add hot pepper, ground cumin or lemon pepper. I prefer them the way I have written it — enough salt to make them snacky and a hint of smoked paprika for an exotic touch.
250 ml (1 cup) raw natural almonds
10 ml (2 tsp) extra virgin olive oil
1.5 ml (¼ tsp) fine sea salt
1.5 ml (¼ tsp) smoked sweet paprika
a few grinds of black pepper
Heat a large skillet over medium heat for a couple of minutes. Reduce heat to medium-low and add the two teaspoons of olive oil. Add the almonds and stir to coat with oil. Toast the almonds, stirring almost constantly, until lightly toasted, about 6 minutes (the nuts will start to give off a slightly toasted aroma, but shouldn’t have any dark or black spots on them). While the nuts are toasting, keep an eye on the heat. Every stove is different. If the oil is smoking or the pan seems otherwise too hot, turn down the heat. If the nuts don’t appear to be toasting, turn the heat up a bit.
Once you are confident that the nuts are lightly toasted, add the salt, paprika and pepper. Stir vigorously to coat the nuts evenly with the spices, and continue to stir constantly for another 30 to 45 seconds, until the spices are fragrant and the nuts are completely toasted. Immediately remove to a bowl and serve.
TORTILLA ESPANIOLA
I couldn’t resist throwing in one actual cooking recipe. This delectable potato “omelet” is pretty easy to make and is absolutely one of the most famous and delicious of the Spanish tapas. Russet potatoes taste best for tortillas that will be served immediately. For a tortilla made in advance, use Yukon Golds.
125 ml (8 Tbsp) extra-virgin olive oil
568 gm (1¼ lb) russet or Yukon gold potatoes (about 3 medium), peeled and sliced into 3 mm (1/8-inch) rounds
1 small to medium onion, halved and sliced 3 mm (1/8 inch) thick
5 ml (1 tsp) salt
8 large eggs
Heat a 10-inch ovenproof skillet (i.e. cast-iron) over medium heat. Add 30 ml (2 Tbsp) of the oil and the onion and sauté until onion is limp and translucent. Remove onions from pan and place in a bowl.
Add 75 ml (5 Tbsp) of the oil to the pan and add the potatoes with ¼ tsp of salt and stir to coat thoroughly with the oil. Sauté, stirring occasionally, with the pan covered at least half the time, until the potatoes are mostly cooked through, about 10 minutes. Remove potatoes from the pan to the bowl with the onion, leaving as much oil as possible in the pan. Turn off the heat.
In a large bowl, beat together the eggs with the remaining salt until eggs are evenly yellow and no streaks of unbeaten white remain. Turn the heat back on to medium.
Add the potatoes and onions to the bowl with the egg. Stir well to mix evenly. Add half of the remaining olive oil to the pan (15 ml, 1 Tbsp). Add the egg-potato-onion mixture and immediately reduce the heat to low. Cover the pan and let cook for about 8 to 10 minutes, until set and mostly cooked through.
At this point you can finish cooking the tortilla under the broiler, or do it the traditional way: use a thin metal spatula to loosen around the edges of the tortilla, place a plate over the top of the pan and, using oven mitts, invert the pan so the tortilla comes out upside down on to the plate.
Pour the last tablespoon of oil in the pan and heat over medium-low heat. Add the upside down tortilla and cook on the second side for 4 to 5 minutes more. Remove from the pan and let cool for 5 minutes before cutting and serving.
Platters, bowls, cheese knife, wooden scoop and shopping bag from Pigeonhole Home Store.
Props sourced by Lia Crowe
For more recipes and classes with Chef Heidi Fink.